Ingesting INSIGHTLY CRM Data onto Azure Data Lake
Sup Folks!
On my last blog I spoke about Integrating data onto Power BI from INSIGHTLY CRM
(link below)
https://nilhanperera.blogspot.com/2019/10/integrating-data-onto-power-bi-from.html
On today's blog, lets have a look at Using Azure Data Factory (ADF) to Copy Data from INSIGHTLY CRM onto Azure Data Lake (ADL).
Much like the previous post we need to use the API provided by Insightly to get access to data.
Let's have a look at the steps needed to do this
Pre-requisites
1. Access to INSIGHTLY. You can sign up for a Free 14 Day Trial.
2. Subscription to Azure Data Factory
3. Azure Data Lake Storage
4. Azure Storage Explorer
Please have a look at my previous post to get an idea on how to obtain the API key and Request URL.
Steps
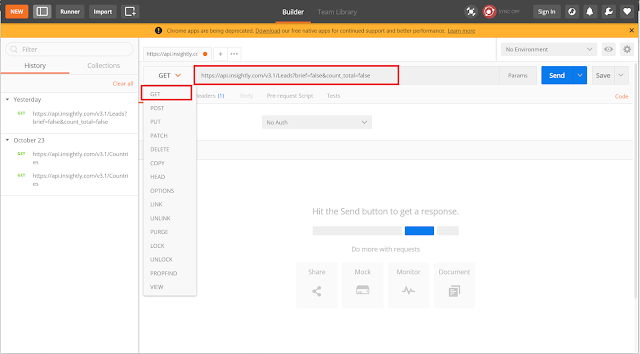
1. Test the Request URL using Postman (Chrome Extension Given Here)
- Select the GET Method and paste the request URL

- Select Basic Authentication from the drop down list

- Insert the API Key as the Username and then click on Send to test

2. Go on to the header tab and copy the value of the authorization Key onto a Notepad


3. Sign into your Azure Data Factory
4. Click on the "Connections" Tab and Create New Linked Service


5. Here you will need to make 2 Linked Services. One for REST API and the other for Data Lake


- 1. REST API
- Select REST from the Data Store Tab

- Give a suitable name > Select an Integration runtime (The default Integration runtime is used on this demo) > Insert the Request URL as the Base URL and Select "Anonymous" for Authentication type > Test Connection and Create

- Data Lake
- Insert the relevant information
- URL can be found under Properties > Data Lake Storage > Primary ADLS file system endpoint
- Storage account key can be found under Access Keys
- Test Connection and create (edited version shown below)

6. Click on the + sign next to the "filter resources by name" text box and select copy data

7. On Copy Data Properties Window, give a proper name and select next

8. Select the Linked Service created for the source (in this case the REST linked Service)

9. Leave Relative URL blank > Select "Get" as Request Method>Expand additional Headers and Add "Authorization" as Name and the value you copied from the Authorization header from POSTMAN > Click on Preview and you will get a preview of data in JSON format

10. Select the linked service made for destination (Azure Data Lake in this case) > Click Next

11. Browse and select folder path > Give the file a proper name > Give a Max number of Concurrent connections if required and select next > Click Next

12. Select the preferred file format ( In this case JSON) > Click Next

13. Do the relevant schema mapping
14. Keep default settings
15. Check the summary to see if everything is in order
16. Deploy (Click Finish)
17. On the main ADF Page expand filters, Select the Copy Data Pipeline that has been created > Click on Debug to Run

13. Do the relevant schema mapping
14. Keep default settings
15. Check the summary to see if everything is in order
16. Deploy (Click Finish)

18. The Pipeline will run successfully if no errors are found

19. You can now view the data on Azure Storage Explorer

And that's about it.
Hope this comes in handy!


Great Blog.. Keep up the good work 👍👍👍
ReplyDeleteThanks Jeewaka
DeleteMost of the key features of Microsoft Dynamics CRM 2016, such as Service Cloud, Marketing, and Sales, are built on Microsoft Azure. This is why it is crucial to understand the benefits of bringing CRM data to anAzure Data Lake Store. Doing so enables you to get the most out of your CRM data. When you store your CRM data in a Data Lake Store, you can query and analyze it by using SQL query language. This gives you access to the CRM data no matter where it is. You can also combine it with other data in the Data Lake Store, including data from other business applications.
ReplyDelete